

Are you wanting to know how to start a blog and make some extra money online? A lot of you over on my Instagram have been saying you want to start a blog but aren’t sure where to start.
I broke down how to start a blog in 6 easy steps to walk you through the process, and the options I wish I had known about when I first started (back in the day!). There are definitely some easy ways to create a blog if you’re just starting out, so don’t let the thought of it overwhelm you!
Blogging is a great way to earn some extra money whilst doing something that you love. It’s also very low cost to get started.
I wrote these step-by-step instructions so you can have your new blog up and running with minimal hassle!
When you buy something through our retail links, we may earn an affiliate commission.
1. Pick your Topic
The first step is choosing what you actually want to blog about. What are your interests and what do you love sharing? You can start broad or pick a niche. Don’t get to hung up on this, you can change it up later down the track!
From there, decide as a name that you’ll want to have as your domain name.
2. Choose a Blogging Platform
The most commonly recommend blogging platform is definitely WordPress (.org, not .com). WordPress is what I use and it’s what I always, always recommend. WordPress has all the tools you need to manage a self-hosted WordPress blog, and you don’t need any design experience to get started.
It’s important to start off your blog on a self-hosted WordPress website, as it’s a huge inconvenience to migrate your blog over to another service later should you change your mind (which I what I did!). You can potentially lose a lot of your posts and images and will most likely have to reformat every post. I definitely wish I had started on WordPress from the beginning.
Having a self-hosted WordPress website has a small cost associated with it (it’s only around $4 a month), but it’s so worth it! It’s so easy to set up and use, and there’s also a lot of free themes you can choose from to make a beautiful looking blog in minutes. There are also so many plugins and add-ons available for WordPress to help your blog look it’s best and give you the insights you need.
The downside of going with a free service like Blogger are:
You don’t own your blog: Your blog is hosted on someone else’s web property, and it could potentially get deleted one day if they wanted to. You could lose everything you’ve worked on in seconds!
You can’t get your own domain name: Free blogging services often make you put their name at the end of your domain (for example www.yourdomain.blogspot.com), which looks unprofessional and spammy.
The features are very basic: You really get the bare minimum when it comes to features because they often want you to pay for an upgrade.
Your can’t make as much money: Free blogs might save you a bit of money in the short term, but in the long term you just can’t monetize a blog on a free blogging platform the sane way you can with a self-hosted blog. Earning money from ads, affiliate links and sponsorships isn’t always possible on a free blogging platform as you need to follow their terms and conditions.
Like I said before, WordPress is only around $4 a month and the ease of use is amazing. And the fact that you actually own your blog is super important (especially if you want to rely on it for income one day)!
3. Choose a Web Host
Now that you’ve decided to go with a self-hosted WordPress blog, you need to choose a host to host your website and make it viewable to the public.
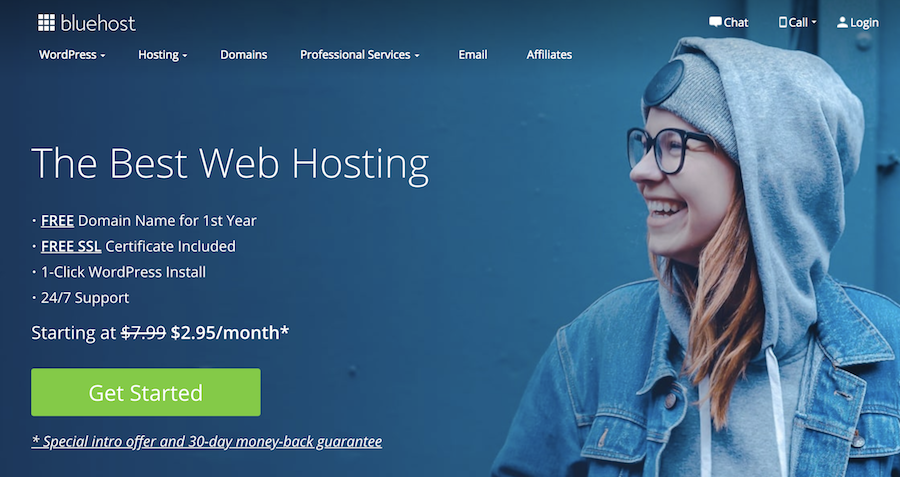
Whilst there are a lot of web hosts out there, I only use and recommend Bluehost. I’ve used Bluehost for years and there are so many reasons why I love it.
Bluehost has amazing customer service if you ever need help with any hosting questions, and they’re so cheap! Their basic option (which is the cheapest) gives you everything you need. They’re fast and reliable and remove so many of the technical difficulties of starting a blog.
They also have 1-click WordPress installation, so Bluehost will take care of all of the technical back-end aspects so you can focus on the design and content creation.
4. Register Your Domain
The simple steps to set up your blog with Bluehost are:
1. Go to the Bluehost website. Click the green button that says “Get Started”.
2. Choose your plan. You’ll be shown a few options but the basic plan should be all you’ll need. You get the most value for your money if you choose the 36 month option, but the 12 and 24 month options are still very cheap.

3. Create your domain. Choose your domain name that you brainstormed earlier and enter this into the “Create a new domain” section.
If your chosen domain name is not available, it means that domain is currently owned by another hosting account. Keep trying some variations until you find one you like that’s available. If you can’t think of any domain names, you can skip this step now and come back to it later (Just click on “I’ll create my domain later”).

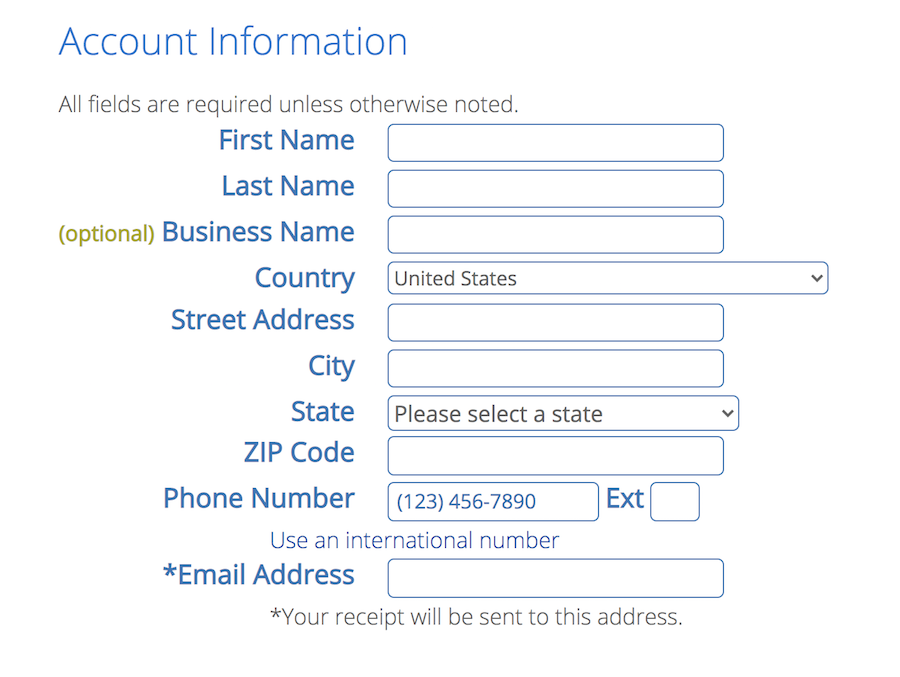
4. Enter your account and billing details. In this step you’ll also be asked what extras you want. I would definitely recommend that you get domain privacy protection. This keeps your personal details private and is only around $1 per month.
And you’re done! Now you’re ready to install WordPress on your website.
Bluehost makes installing WordPress very simple and automatically installs it on your hosting account once you’ve completed the set-up process. This is another reason why Bluehost is so great – the process isn’t as simple with other hosting providers.
5. Design Your Blog
Now you’re moving on to the fun part! It’s time to pick a theme.
There are plenty of free themes that can work well for if you’re just getting started, but if you want something a bit more professional looking, consider a paid theme.
It’s likely that you’ll end up switching to a paid theme eventually so it’s easier to just pick a theme you really love from the start to save you having to re-customise everything in a month or two (this is another thing I wish I had done when I started my blog).
There are so many amazing paid themes out there these days – I love the ones from 17th Avenue. This theme is a nice simple theme for if you’re just starting out whilst this one has a few more features. Both are easy to use and look nice and professional. If you want to see a more in depth post on specific WordPress themes I love let me know!
I list out all of my other favourite WordPress themes in my post on 9 Best WordPress Themes for Blogs.
Once you’ve chosen your theme you can also start adding plugins. Plugins are bits of code that add specific functions to your website. I list out the plugins I recommend getting over on the Resources Page. It’s definitely worth getting plugins that help you with SEO, social sharing, managing email list and tracking analytics.
6. Create Your Content
Now you can get started on creating your blog posts and pages – exciting!
Pages are used for your more static content (for example an “About” page), whilst the posts will be what you’ll publish your blog post content as.
When you start writing content, you want to make sure it’s optimised for Search Engines, also referred to as SEO. This is a huge topic but if you want me to cover this in a post let me know! There is a really useful plugin to help with SEO that I’ve listed in the Resources Page.
You’ll also want to make sure you have Google Analytics set up. Google Analytics tracks the performance of your website and will tell you how many views you’re getting, where these users come from and what content they’re looking at on your blog (along with so much more).
Once you’ve created a Google Analytics account, you will be provided with a tracking code which you can add to your WordPress using a plugin.
Useful Resources
I’ve put together a page of useful resources that will help you on your blogging journey! You can find them on the Resources Page. This page has plugins I recommend you add to your blog along with email service providers so you can start to build your email list.
I hope this guide has helped you in starting your blog. If you have any questions feel free to reach out to me on Instagram. I don’t always get to my DMs but I’m always hanging around in the comments so leave me a comment on one of my recent posts and I’ll get back to you!
Happy Blogging!
When you buy something through our retail links, we may earn an affiliate commission.
WANT THE LATEST POSTS STRAIGHT TO YOUR INBOX? JOIN THE MAILING LIST
Pin this page for later!
Start a Blog - Free 5 Day Course!
Are you wanting to know how to start a blog and make some extra money online? Join my free 5 day email course where I’ll walk you though step-by-step how to start a blog, the right way!